


FALL, Lifestyle
Carving The Perfect Pumpkin
October 14, 2021
One of the best parts of Halloween is walking through the neighbourhood and seeing all the fun and creative jack-o-lantern designs. From classic triangle eyes and noses to more intricate ghoulish faces, there is no symbol more iconic to Halloween than a glowing pumpkin.
Pumpkins are part of the winter squash family which includes butternut, acorn, delicata, Hubbard, and spaghetti squash. Pumpkins come in various colours, including traditional orange, red, blue, and even white.
The firm skin or rind has made pumpkins a popular choice for carving since the 19th century. Before this, peasants would use turnips to carve spooky faces as they tried to ward off spirits.
Today pumpkin carving enthusiasts use a variety of techniques to achieve their desired look.
- Carving
- Scaping
- Painting
- No-Carve
Each of these pumpkin carving styles results in a unique look that will have parents and kids alike smiling as they walk up your path for Halloween treats.
So how do you carve the perfect pumpkin for Halloween? It can be a little tricky, so we have pulled together some helpful hints to ensure your pumpkin looks great.
CHOOSING THE RIGHT PUMPKIN
Carving the perfect jack-o’-lantern starts with choosing a pumpkin that is the right shape for your design. Think about the kind of look you want to achieve. Do you want a big face on the front? If so, choose a pumpkin that has a nice clean rounded look. If you will use the stem as the nose, then make sure your pumpkin sits flat on the ground when laid sideways to ensure it doesn’t roll. Regardless of the shape you choose, make sure it is fresh with no bruises, has a smooth surface – ridges make it harder to carve, a sturdy stem, and a flat base, so it doesn’t roll around while you are trying to carve.
CUT FROM THE BOTTOM
To prevent your pumpkin from collapsing, try carving it from the bottom. This helps the pumpkin maintain its structure so you can enjoy your work of art longer. If you do carve from the top, be sure to cut at an angle so that the lid won’t fall into your pumpkin when you put it back on top.
SCOOP OUT THE PUMPKIN
Kids love helping with scooping out the pumpkin. Make the job easier by using a pumpkin claw or a large deep spoon. Ice cream scoops also work great. Remove all the pulp and seeds and finely scrape the walls to approximately 1 inch thick, allowing for easier carving.
CHOOSE YOUR DESIGN
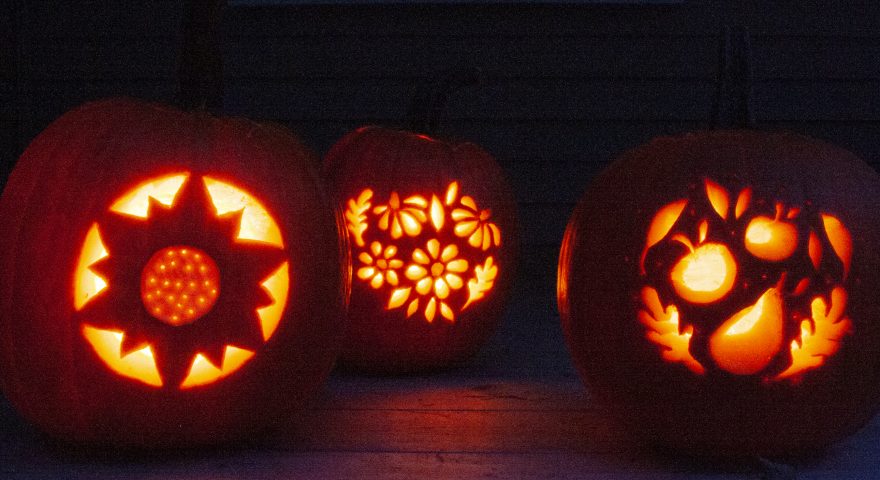
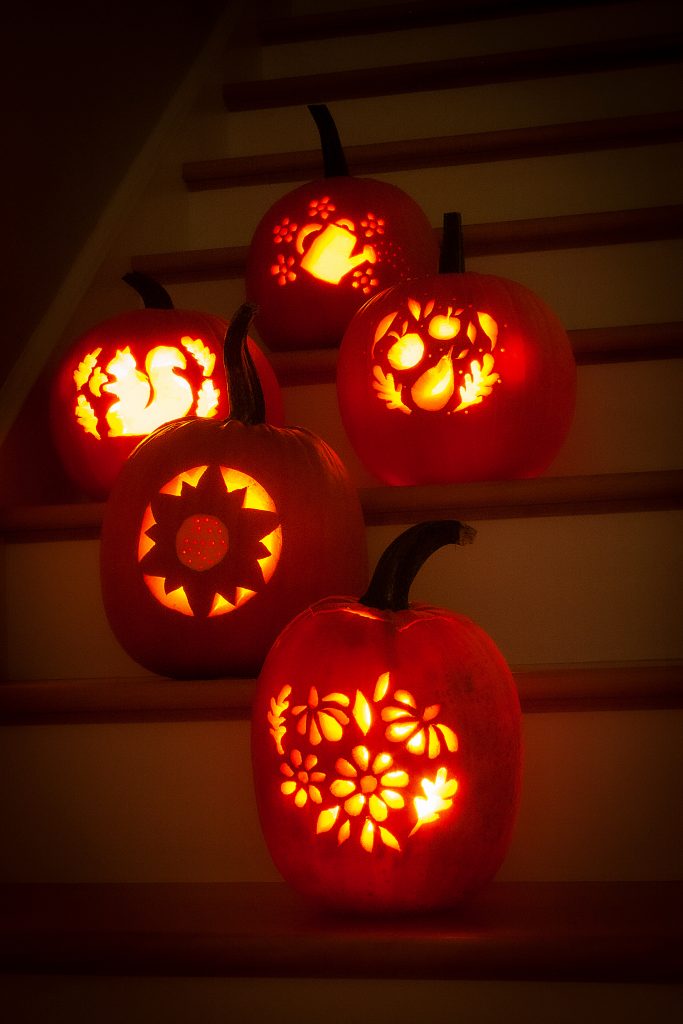
Now that your pumpkin is ready for carving, it is time to add your design. Using a template will help ensure you get the perfect look for your pumpkin. We recommend a simple design for the novice or young pumpkin carver, such as the Glowing Sunflower. For more experienced pumpkin carvers, try the Floral Bouquet or Autumn Harvest. Check out all our garden-themed templates below. Tape your template to your pumpkin and use a needle or nail to punch holes, tracing your pattern into your pumpkin. Another option is to cut out your template pieces, tape them on, and cut directly around them.
CUTTING THE PUMPKIN
Always use a sturdy surface when carving your pumpkin. Use a pumpkin carving tool or a serrated kitchen knife to ensure accuracy and a clean cut. Take things slow and cut all the way around each shape to ensure the cutouts pop out easily. Use an “up and down” motion and when it’s time to change directions on your pattern, remove your cutting tool, change direction, and start cutting again with an up and down motion.
LIGHTING THE CANDLE
Once you have completed carving your pumpkin, let a candle burn inside for a few minutes. Keep an eye on where you see heat marks appear and cut a small hole in this spot to allow heat to escape by creating a chimney. This will prevent your pumpkin from drying out. Try using multiple candles or battery operated string lights for different effects.
PERFECT YOUR PUMPKIN CARVING TECHNIQUE
If you are ready to take your pumpkin carving to the next level, there are a few fun and easy techniques to try. Traditionally pumpkin carving has been done by cutting holes into the pumpkin to create your design. You can also complete more intricate designs using methods like shading and shaving, giving your pumpkin more personality.
PUMPKIN SHAVING
You have probably seen pumpkins that have been shaved to create a design. They give off a stunning orange glow like a magically Halloween orb of light. This technique requires a little patience, but the results are worth it.
Step 1:
Start by using a template to outline your design. Designs like the Hungry Squirrel and Watering Can are perfect for the shaving technique. You want a design that can allow you to mix and match carving styles potentially.
Step 2:
Determine which areas of the pumpkin you are going to carve and which areas you will shave.
Step 3:
Cut out any areas you want to have a traditional carved pumpkin look.
Step 4:
Lightly begins shaving the remaining areas. Go slow to ensure you don’t scrape too deeply. Cutters with a v-shape blade are perfect for shaving as they provide a clean and accurate cut.
Step 5:
Once you are done shaving, add details such as holes for additional light to shine through within the areas you shaved. Remember, the rind of your pumpkin will be weakened slightly by shaving, so add light holes carefully and gently.
Step 6:
Light your pumpkin to see your fantastic design come to life.
PAINTING YOUR PUMPKIN
Another child-friendly option for decorating your pumpkin is painting. Once again, templates are a great way to help create easy to follow patterns. Simply outline your template pattern on the pumpkin rind, then choose your favourite paint colours to complete your design.
You can mix and match carving with painting. You can also use paint to outline areas you have carved to create a bolder look. Bright paint colours will create the most impact.
BE CREATIVE
Halloween is a time of magic and creativity. From costumes to home decor, let your imagination have fun. Check our collection of fun and easy garden-themed patterns for your pumpkin below and happy carving from Sheridan Nurseries.
PUMPKIN TEMPLATES
SHARE THIS ARTICLE


